Iron Condor vs Iron Butterfly Strategies - Two Different Ways to Trade a Sideways Market
Published on January 19, 2026Table of Contents
- Key Takeaways
- What iron condor and iron butterfly strategies have in common
- Structure and payoff of the iron butterfly
- Structure and payoff of the iron condor
- Butterfly vs iron condor: main differences
- Iron fly vs iron condor: risk, reward, and trader profile
- Butterfly spread vs iron condor in sideways markets
- Iron Condor vs Iron Butterfly- Real-Market Examples
Reviewed by Leav Graves
Table of Contents
- Key Takeaways
- What iron condor and iron butterfly strategies have in common
- Structure and payoff of the iron butterfly
- Structure and payoff of the iron condor
- Butterfly vs iron condor: main differences
- Iron fly vs iron condor: risk, reward, and trader profile
- Butterfly spread vs iron condor in sideways markets
- Iron Condor vs Iron Butterfly- Real-Market Examples
Traders often compare iron condor vs iron butterfly when looking for ways to profit in a quiet market. Both are neutral, risk-defined strategies that rely on time decay and low volatility. This article explains how butterfly vs iron condor setups differ in structure, profit zones, and trader preferences.
KEY TAKEAWAYS
- Iron condor vs iron butterfly is a comparison between two neutral options strategies designed to profit from limited price movement and time decay
- The iron condor has a plateau-shaped profit zone where maximum profit is earned if price stays between the short strikes
- The iron butterfly has a triangular profit zone, peaking at the short strike but narrowing quickly as price moves away
What iron condor and iron butterfly strategies have in common
Both the iron condor and iron butterfly are neutral, risk-defined strategies built to profit from time decay and calm markets. They work best when price stays still, letting the options lose value over time. In the iron condor vs iron butterfly comparison, both share a nearly identical structure and logic.
Each setup uses four option legs with the same expiration: two calls and two puts. Both collect premium upfront, creating a credit position that profits when the options expire worthless.
- The iron condor sells one put below the market and one call above it, then buys one further put and one further call for protection. The stock price usually stays between the two sold strikes.
- The butterfly works the same way, except both short options share the same strike, forming a tighter center point for maximum profit.
Both are risk-limited strategies that benefit from time passing and volatility staying low.
Structure and payoff of the iron butterfly
The iron butterfly uses one at-the-money short call and one at-the-money short put, balanced by an out-of-the-money long call and an out-of-the-money long put for protection. This setup creates a triangle-shaped payoff, where the sharp peak marks the maximum profit if the underlying closes exactly at the short strike, as you can see from the image below (which is the same payoff you’d see on our advanced screener for options):
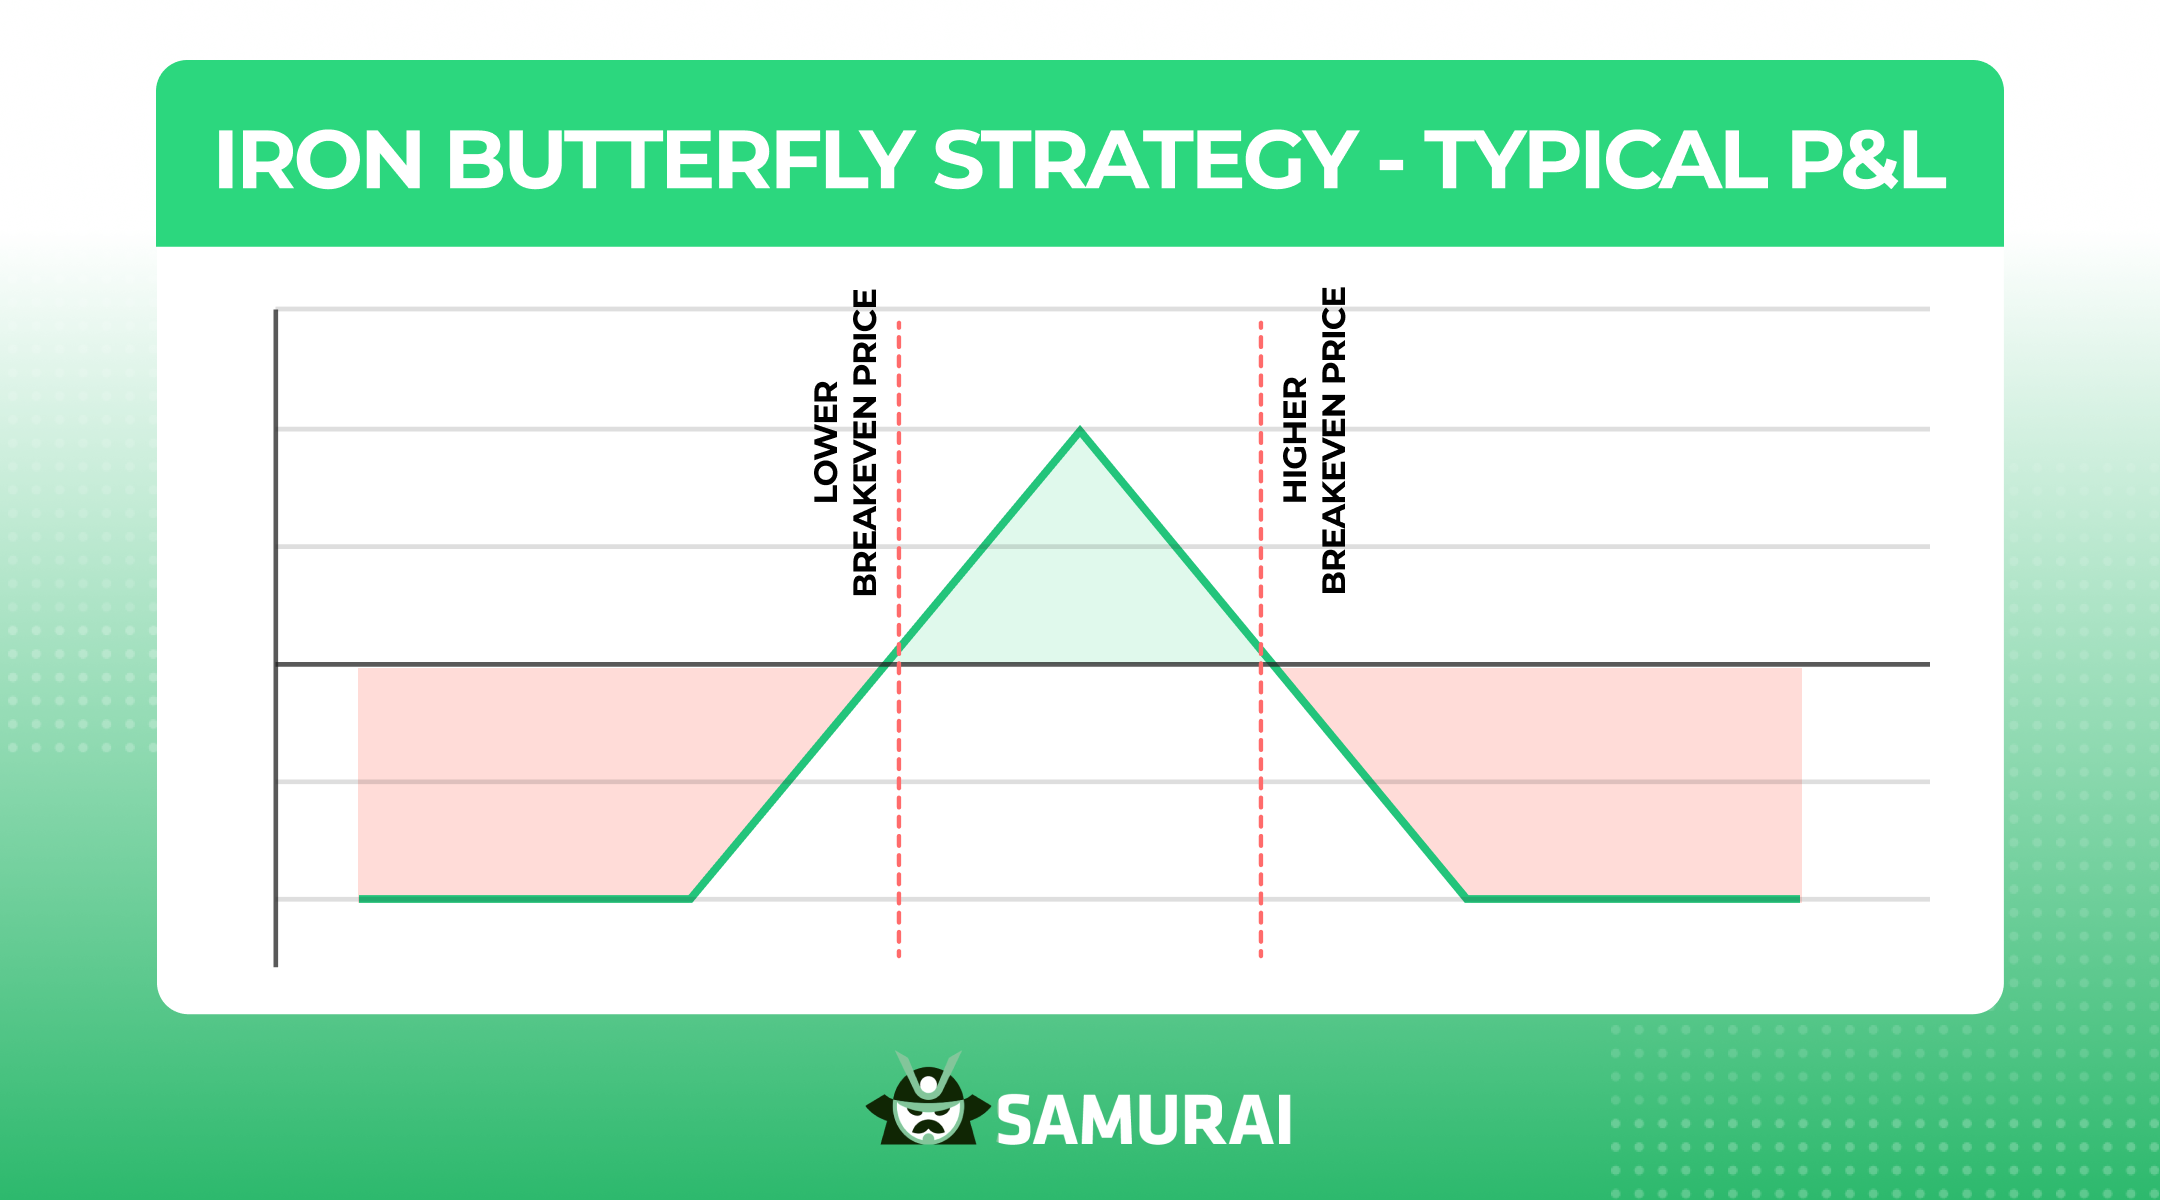
As price moves away from that point, profits decline evenly on both sides until the loss is capped at the long strikes. Traders like the symmetry and simplicity of this setup, especially when comparing butterfly vs iron condor positions in low-volatility markets.
The iron fly vs iron condor debate usually comes down to range tolerance and premium size. The butterfly collects more credit but requires the stock to stay close to the center strike, while the condor offers a wider comfort zone. In short, the butterfly spread vs iron condor trade-off is precision versus flexibility.
Structure and payoff of the iron condor
The iron condor uses four out-of-the-money options: a short call and short put closer to the current price, paired with a further out-of-the-money long call and long put for protection. This setup defines both risk and reward from the start and profits when the stock trades in a range.
The payoff shape looks like a plateau, not a triangle like in the iron butterfly. You can see it in the image below:
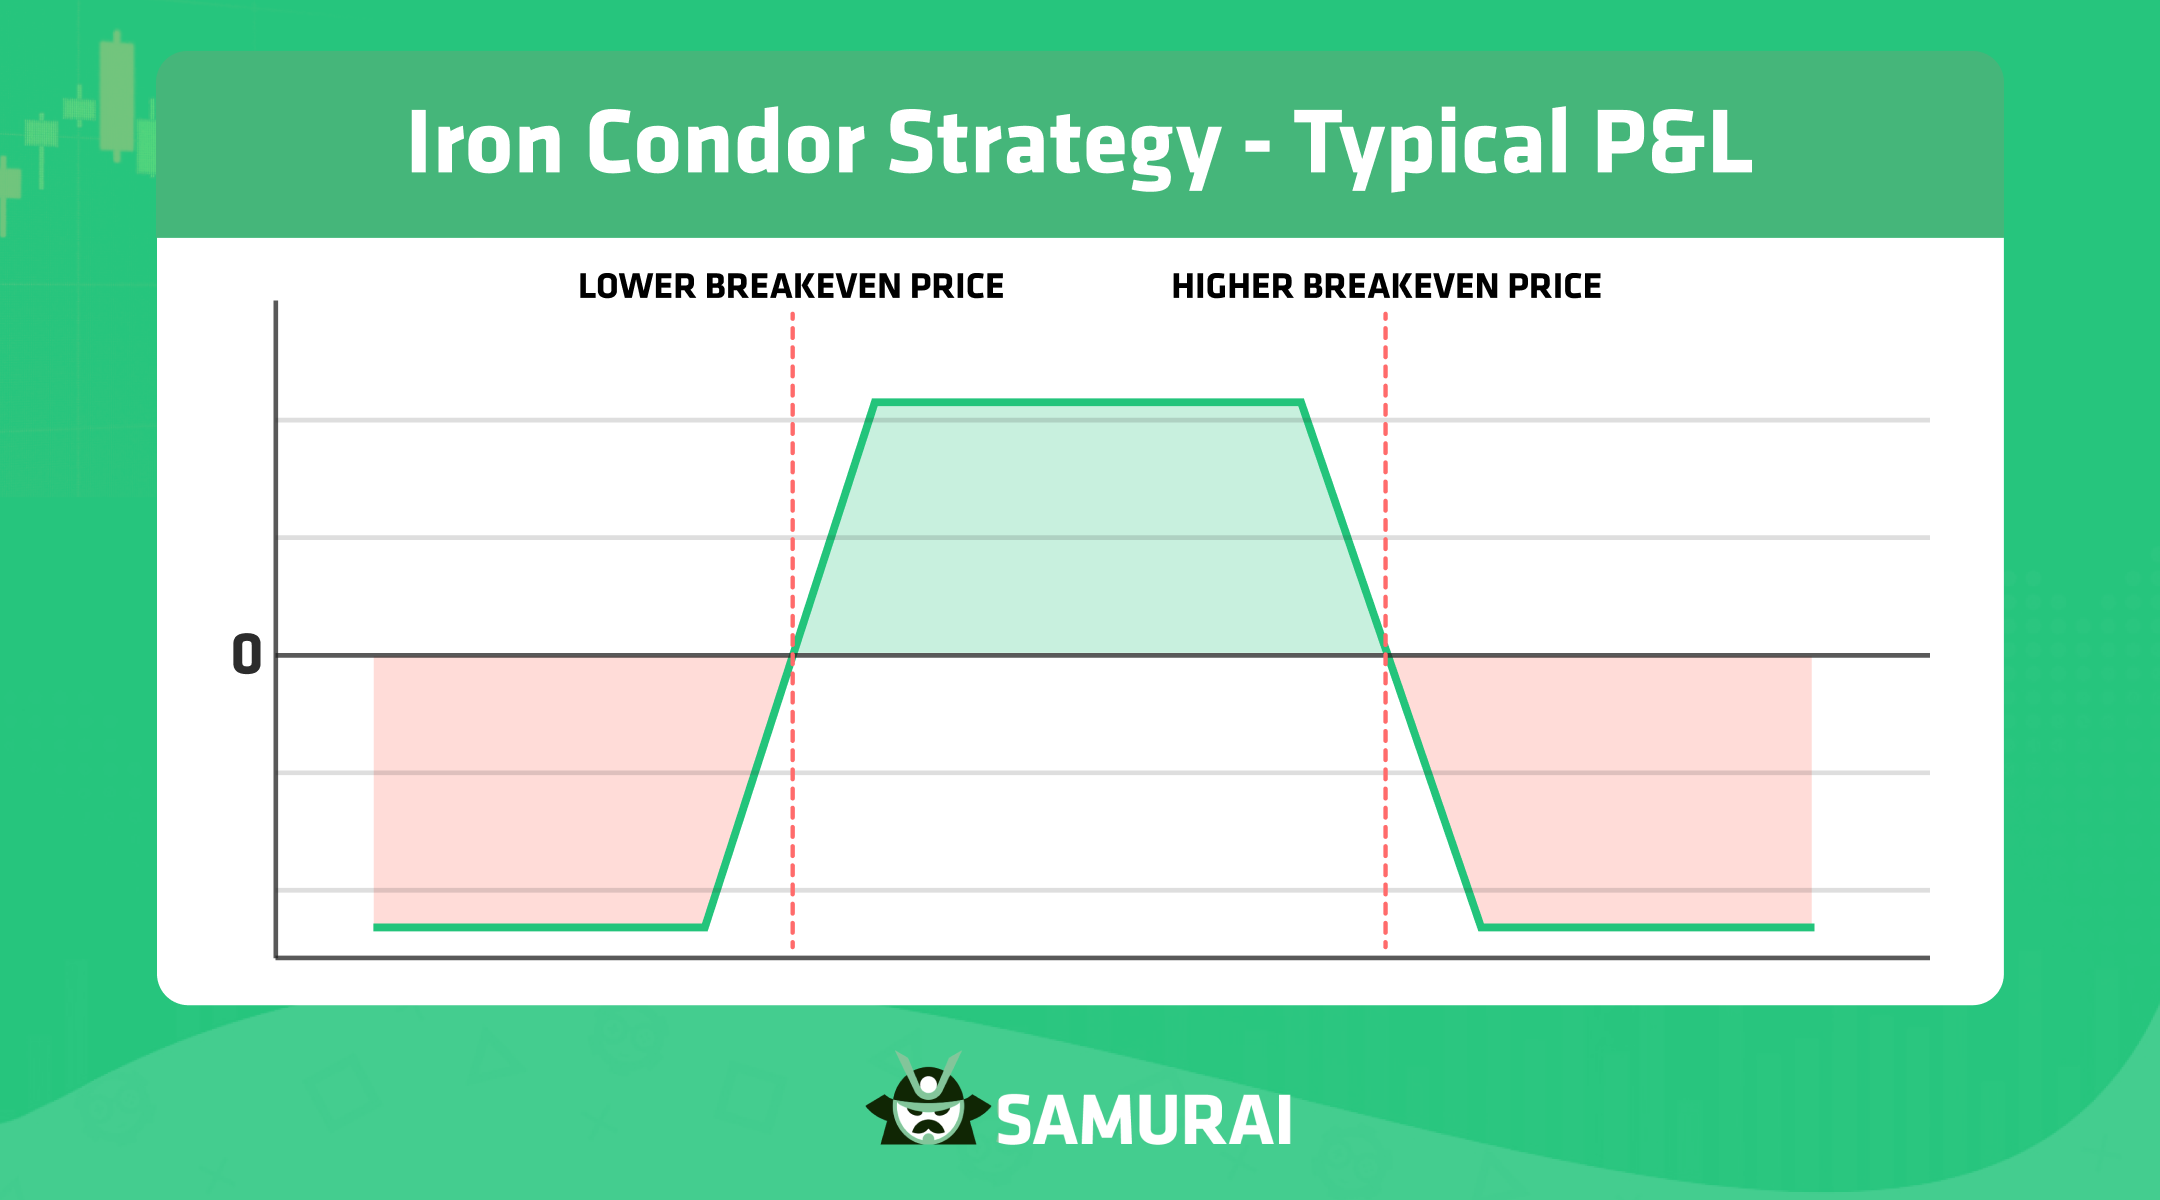
The flat top of the trapezoid represents the zone where the trade earns its maximum profit.
- Max profit happens if the underlying stays between the two short strikes at expiration.
- Max loss occurs when the price moves beyond the long strikes on either side.
- The position benefits from time decay and falling volatility.
In the iron condor vs iron butterfly comparison, the condor offers a wider comfort zone but less credit received. That’s why many traders see the butterfly vs iron condor decision as range width versus payout size, much like choosing iron fly vs iron condor or butterfly spread vs iron condor setups.
Butterfly vs iron condor: main differences
In the iron condor vs iron butterfly comparison, the main difference lies in structure and payoff shape. The iron butterfly behaves like an at-the-money short straddle with protective wings, while the iron condor combines two out-of-the-money credit spreads. Both are neutral, defined-risk strategies, but they approach market range and reward differently.
Here is a simple infographic in which we compared the 2 strategies:
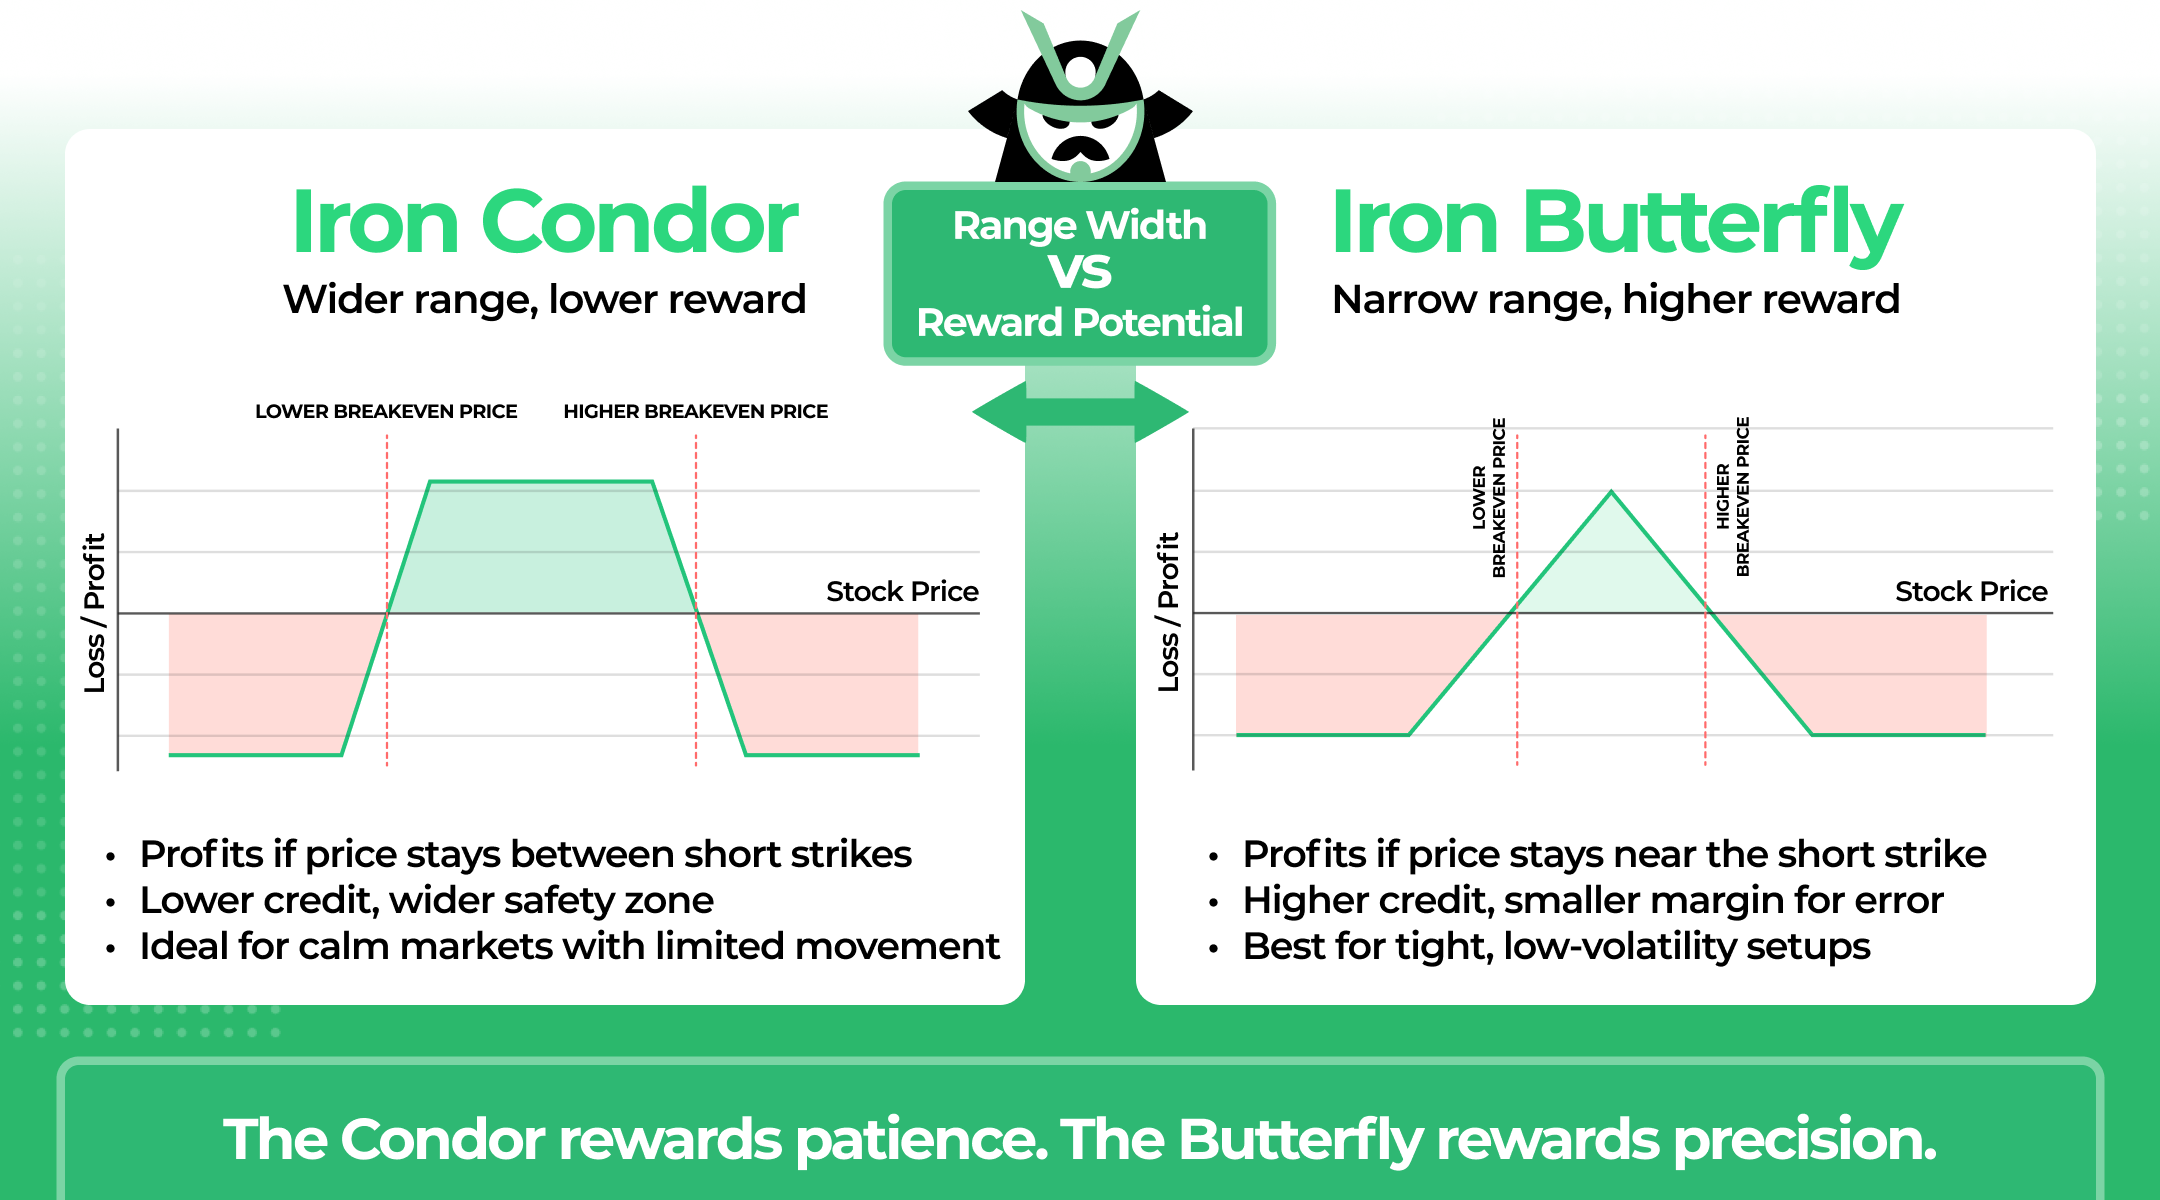
The butterfly has its short legs at the same strike, creating a tighter “triangle” profit zone. The condor spreads its short legs apart, forming a flat “plateau” of maximum profit. This difference defines how forgiving each strategy is.
- The iron butterfly (or iron fly) collects a larger credit but requires the price to stay near the middle strike.
- The iron condor collects less credit but allows a wider range for success.
- The butterfly is more sensitive to implied volatility changes.
Traders often choose butterfly vs iron condor setups based on volatility outlook and price expectations. When volatility is high and expected to drop, the butterfly spread vs iron condor setup offers better reward potential. When the goal is to give the stock more breathing room, the condor is often preferred. In short, the iron fly vs iron condor choice is precision versus flexibility.
Iron fly vs iron condor: risk, reward, and trader profile
The iron fly is another name for the iron butterfly. It attracts traders who aim for higher potential returns but can tolerate a narrow range for success. The condor, on the other hand, appeals to those who prefer flexibility, smaller profit targets, and a wider safety zone for price movement.
Below is a quick comparison that highlights the main differences between the two:
Feature | Iron Fly (Iron Butterfly) | Iron Condor |
Structure | ATM short call + ATM short put, long wings | Two OTM credit spreads |
Profit Zone | Narrow, triangle-shaped | Wide, plateau-shaped |
Credit Received | Higher | Lower |
Risk/Reward | Higher risk, higher reward | Lower risk, lower reward |
Best For | Traders expecting little movement | Traders wanting more range tolerance |
In the iron condor vs iron butterfly comparison, choosing butterfly vs iron condor or iron fly vs iron condor setups depends on personal style. The butterfly spread vs iron condor choice often comes down to confidence in the price staying near the center.
Butterfly spread vs iron condor in sideways markets
In sideways markets, both the butterfly spread and the iron condor work best when volatility is low and price stays within a defined range. This environment is especially common in short-term options trading, where traders focus on brief periods of price stagnation and aim to harvest time decay over days or weeks rather than months.
Each strategy profits from time decay, but they respond differently to changes in volatility and movement.
The butterfly spread vs iron condor comparison shows that the butterfly (or iron fly) performs better if the underlying trades tightly around the center strike, while the condor offers more breathing room. When volatility drops, both benefit, but the iron butterfly gains more because it sells higher-priced at-the-money options.
- The butterfly rewards precision but punishes even moderate price moves.
- The condor tolerates more movement but earns a smaller premium.
- Both suffer if volatility spikes or price breaks out sharply.
In the iron condor vs iron butterfly decision, traders often pick the condor for wider sideways markets and the butterfly when they expect a tight trading range with stable volatility.
Iron Condor vs Iron Butterfly- Real-Market Examples
Let’s compare the two strategies on the same ticker: AAPL, currently trading close to $255. Both trades use the same expiration date, but differ in strike placement and payoff shape. Since both setups combine four contracts into a single position, they are classic examples of multi-leg options strategies, where payoff depends on how multiple legs interact rather than on a single directional bet.
In the first setup, we have an iron fly built by selling a 230 call and a 230 put, while buying a 200 put and a 260 call for protection:
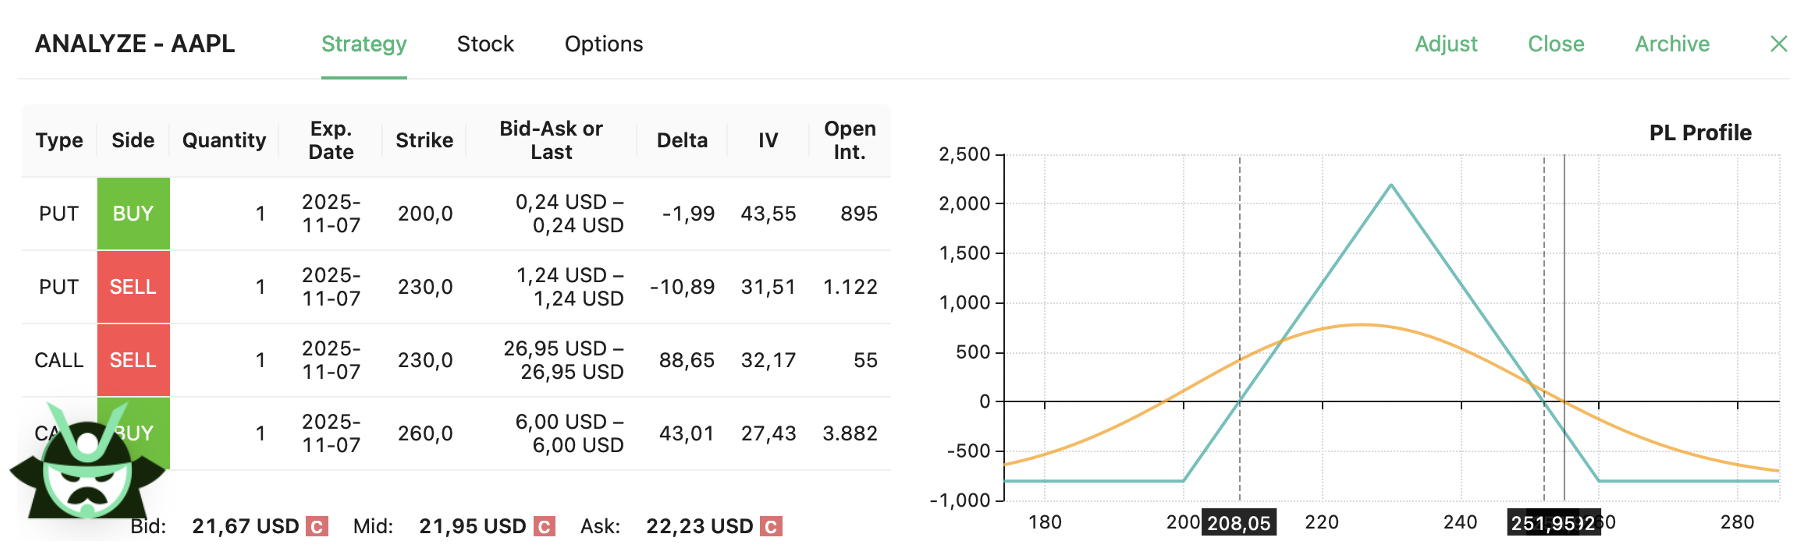
This creates the classic “triangle” payoff of an iron butterfly. The trade collects a larger credit because both short options are at-the-money, which gives it higher potential return but a much narrower range for success. The profit peaks sharply around 230 and declines symmetrically as AAPL moves away from that strike. Beyond 200 or 260, the loss is capped at roughly $800.
The second setup is an iron condor using the same expiration but wider strikes: short the 220 put and 240 call, and buy the 200 put and 260 call for protection:
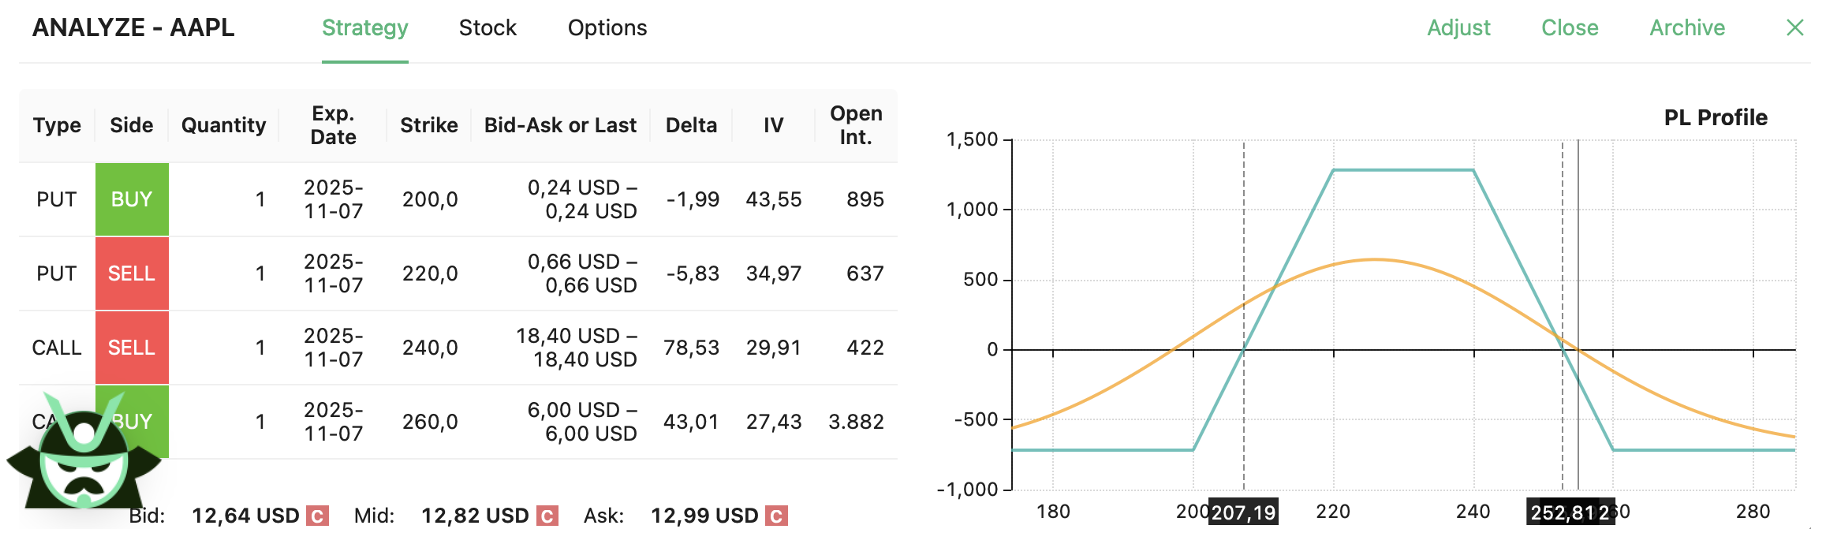
The payoff diagram forms a “plateau” instead of a triangle. The trade receives a smaller credit, but it allows AAPL to trade freely between 220 and 240 while still reaching maximum profit. In the worst-case scenario, we would lose a bit over $700 on both sides of the trade.
This iron condor vs iron butterfly comparison highlights a key difference: the butterfly rewards precision, while the condor rewards patience. Traders expecting a tight, range-bound move might choose the butterfly, while those who prefer a wider safety margin often lean toward the condor. In both cases, risk and reward are clearly defined before entering the trade.
AUTHOR
 Gianluca LonginottiFinance Writer - Traders Education
Gianluca Longinotti is an experienced trader, advisor, and financial analyst with over a decade of professional experience in the banking sector, trading, and investment services.
REVIEWER
 Leav GravesCEO
Leav Graves is the founder and CEO of Option Samurai and a licensed investment professional with over 19 years of trading experience, including working professionally through the 2008 financial crisis.