Options Trading Checklist - What to Review Before Every Trade
Published on November 10, 2025 | 7 min read(Last updated on February 26, 2026)
Table of Contents
- Key Takeaways
- Step 1: Define Your Market Outlook
- Step 2: Check Liquidity
- Step 3: Assess Implied Volatility
- Step 4: Check for Catalysts (Earnings & Dividends)
- Step 5: Select the Right Strategy
- Step 6: Pick Strike Prices
- Step 7: Choose an Expiration Date
- Step 8: Size the Position
- Step 9: Plan Trade Management
- Step 10: Paper Trade
Reviewed by Leav Graves
Table of Contents
- Key Takeaways
- Step 1: Define Your Market Outlook
- Step 2: Check Liquidity
- Step 3: Assess Implied Volatility
- Step 4: Check for Catalysts (Earnings & Dividends)
- Step 5: Select the Right Strategy
- Step 6: Pick Strike Prices
- Step 7: Choose an Expiration Date
- Step 8: Size the Position
- Step 9: Plan Trade Management
- Step 10: Paper Trade
Most traders rush into a position without checking the basics and end up paying for it. An options trading checklist helps you slow down, remove emotions, and focus on the right steps. This article shows what to review before every trade, from market outlook to risk management.
KEY TAKEAWAYS
- An options trading checklist is a trick that can help you make smarter trades by forcing consistency and removing emotions.
- It guides you through the key things to check before entering any trade from the market outlook to risk management.
- Using an options trading checklist keeps your trading process structured and repeatable.
Step 1: Define Your Market Outlook
The first step in any options trading checklist is to know what you expect the market to do. Before picking strikes or expirations, you need a clear directional bias: bullish, bearish, or neutral. Without this, you risk putting on trades that don’t fit the market.
Your outlook should be based on evidence, not gut feeling (otherwise, your whole options trading checklist won’t be reliable). That means checking a mix of signals:
- Technicals: price action, moving averages, support and resistance
- Fundamentals: earnings trends, company guidance, valuation
- Macro: interest rates, inflation data, economic reports
- Sector trends: how the industry is moving compared to the broad market
Once you know your bias, match it with the right strategy. This avoids costly mismatches. For example, if you expect only a small bullish move, buying an outright call may not make sense since you need a bigger swing to profit. A credit spread, on the other hand, can benefit even from a mild push upward.
The key idea is simple: don’t guess, and don’t force a trade. Let the market guide your setup. By making market outlook the first step in your options trading checklist, you build every trade on a foundation of logic instead of emotion.
Step 2: Check Liquidity
Liquidity makes the difference between a smooth trade and one that eats into your profits, so this is something else you want to add to your options trading checklist. Tight bid/ask spreads and strong open interest mean you can get in and out without losing extra money on slippage. Wide spreads or thinly traded contracts can turn a winning idea into a break-even or even a losing trade.
In this case, our bid-ask spread filter can come in handy:
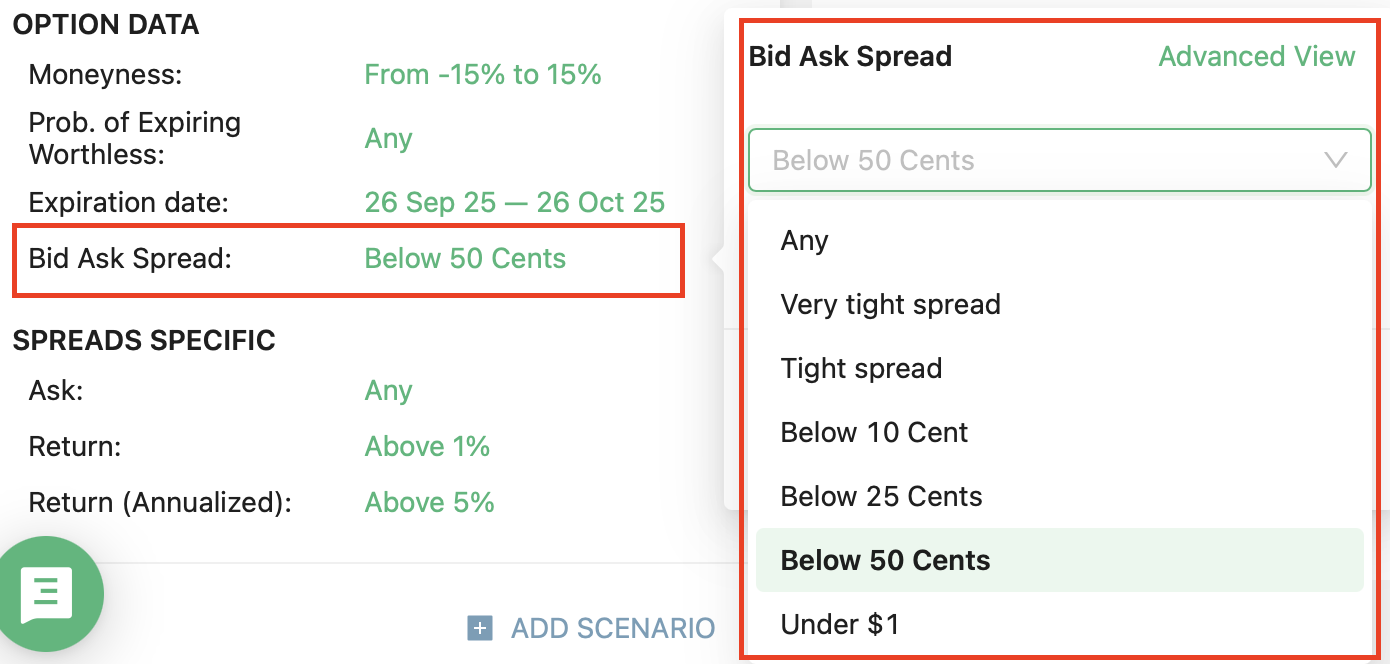
Think of it this way: if a spread is 0.10 wide, you might lose a few dollars on entry and exit. If it’s 1.00 wide, you’re giving away too much edge before the trade even starts. By filtering for liquid options, you make sure your strategy has a fair chance to play out as planned.
Step 3: Assess Implied Volatility
Implied volatility (IV) shows what the market expects in terms of movement. High IV means traders expect bigger swings, low IV signals calmer conditions. But raw IV alone doesn’t tell you if options are expensive or cheap. That’s why your options trading checklist should include IV rank.
In our screener for options trades, IV rank measures today’s IV compared to the past year. For example, an IV rank of 95% means that 95% of the days had lower IV, so current premiums are expensive. On the flip side, an IV rank of 10% means options are historically cheap.
Ignoring IV can lead to common mistakes:
- Buying options when IV is inflated, only to see premiums collapse
- Selling options when IV is at record lows, leaving little room for profit
If you assess IV with context, you avoid mispricing traps and pick strategies that fit the market environment.
Step 4: Check for Catalysts (Earnings & Dividends)
Earnings and dividends can flip a trade upside down if you don’t plan for them. Earnings often spark large, unpredictable moves. You may want to adjust your strategy, shorten your time frame, or skip the trade. Dividends matter too, since they can trigger early assignment on calls and change pricing.
Your options trading checklist should always include a check for these dates:
- Earnings reports
- Dividend ex-dates
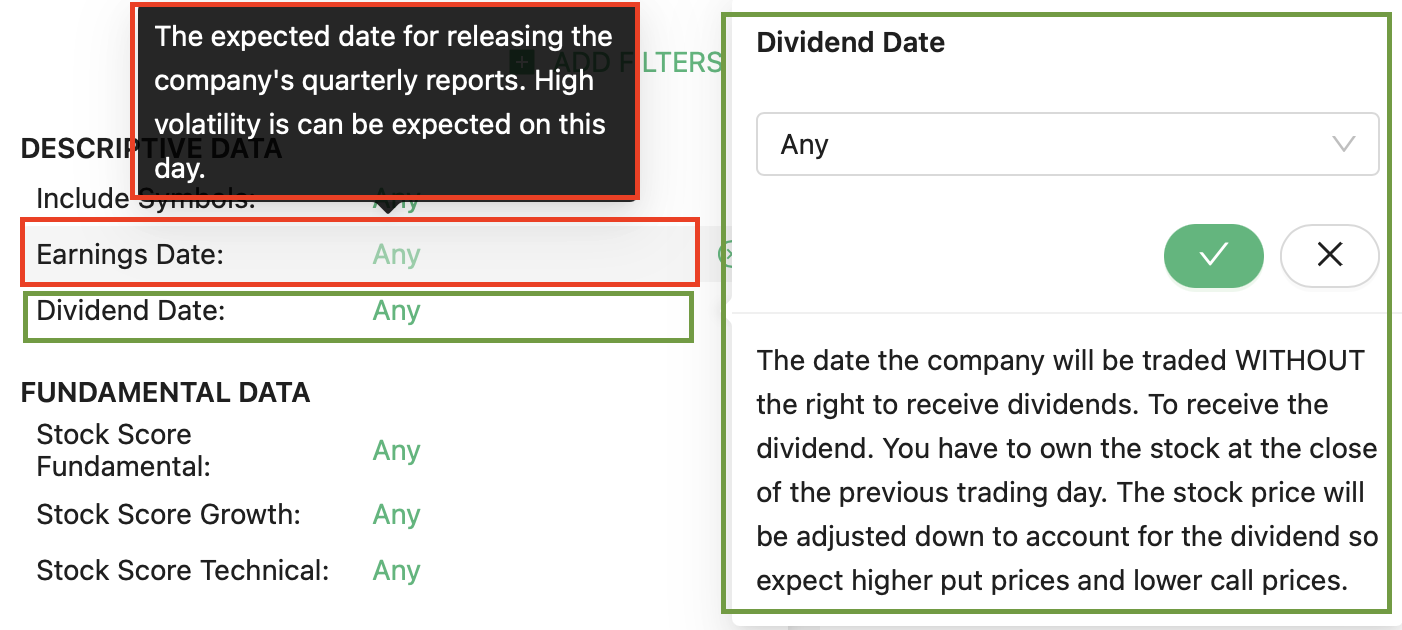
Make sure these events fall inside or outside your trade window on purpose, not by accident.
Step 5: Select the Right Strategy
Your strategy should always match your market outlook and implied volatility. A mismatch is one of the fastest ways to lose money. Use your options trading checklist to keep it simple:
- Bullish outlook → long call spread or put credit spread
- Neutral outlook → iron condor or butterfly
- High IV → selling strategies like credit spreads or straddles
- Low IV → buying strategies like long calls or debit spreads
If you combine our predefined strategies with the custom strategy options screener, we cover a very wide array of possible setups:
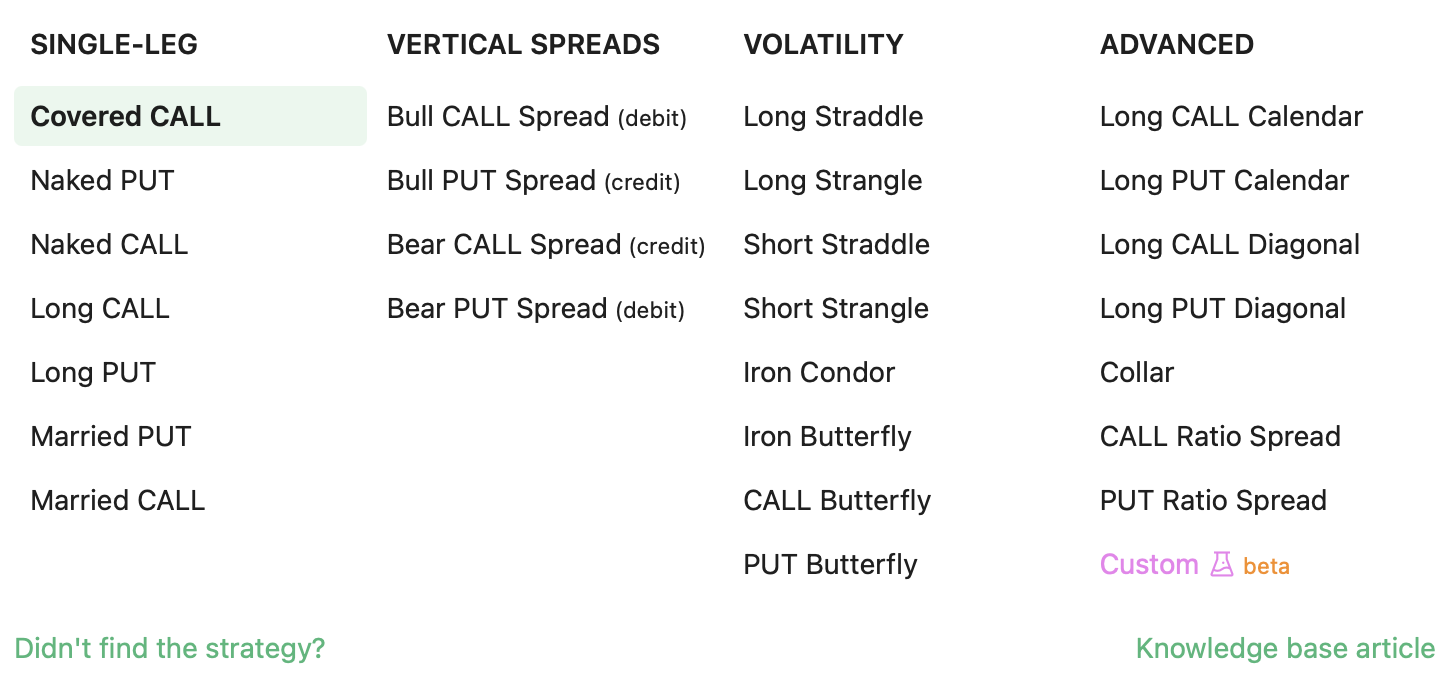
The rule is clear: fit the strategy to the conditions, not the other way around. This discipline helps avoid forcing trades that don’t make sense. If you want to focus on setups with strong statistical odds, explore our guide to high probability options strategies, where we break down trades designed to win more often while managing risk effectively.
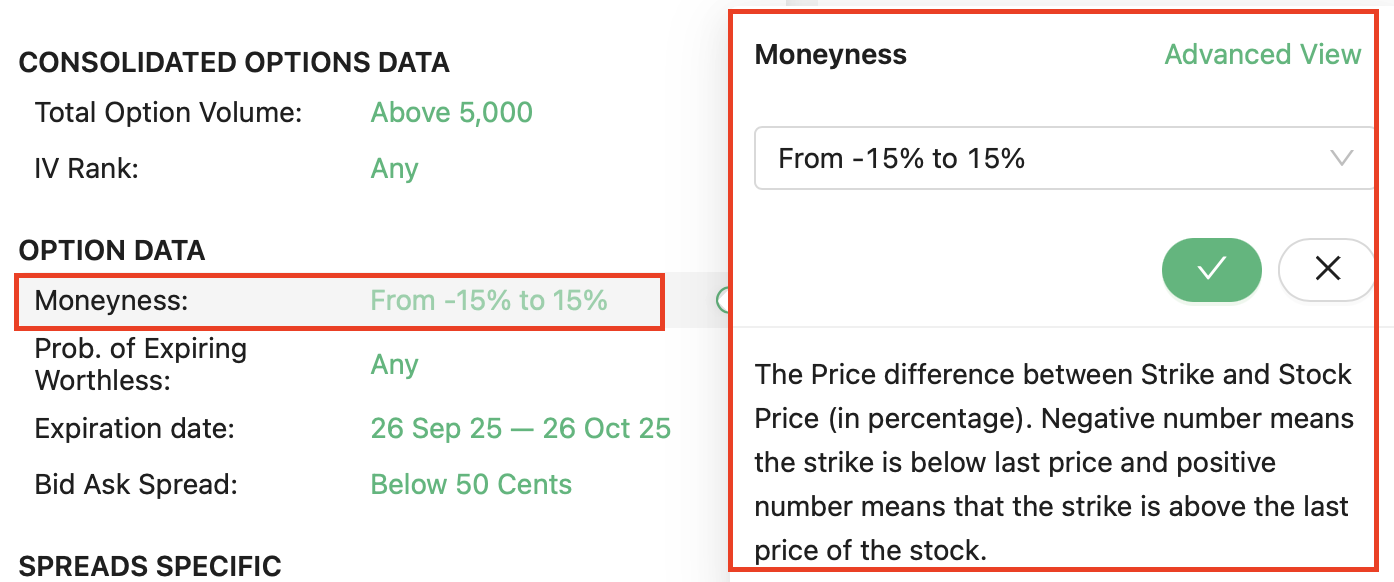
Step 6: Pick Strike Prices
Strike selection decides how much risk, reward, and probability your trade carries. ITM options cost more but have higher odds of success. ATM strikes give balanced risk/reward. OTM strikes are cheaper but need a stronger move to pay off. Your options trading checklist should remind you to weigh these tradeoffs.
Key points to check:
- ITM = higher chance, lower reward
- ATM = balanced setup
- OTM = cheaper entry, higher risk
Smart strike choice keeps your capital use efficient and your trades realistic.
Step 7: Choose an Expiration Date
Expiration sets the pace of your trade. Short-dated options decay fast, making them good for quick plays but risky if timing is off. Longer-dated contracts cost more, yet give your thesis room to work. Your options trading checklist should remind you to align expiry with your trade idea.
- Short-dated = fast decay, lower cost, quick decisions (if you're considering short-dated trades as part of a more active approach, our guide on day trading options breaks down how that style differs from swing or position trading and what it requires).
- Longer-dated = slower decay, higher cost, more flexibility
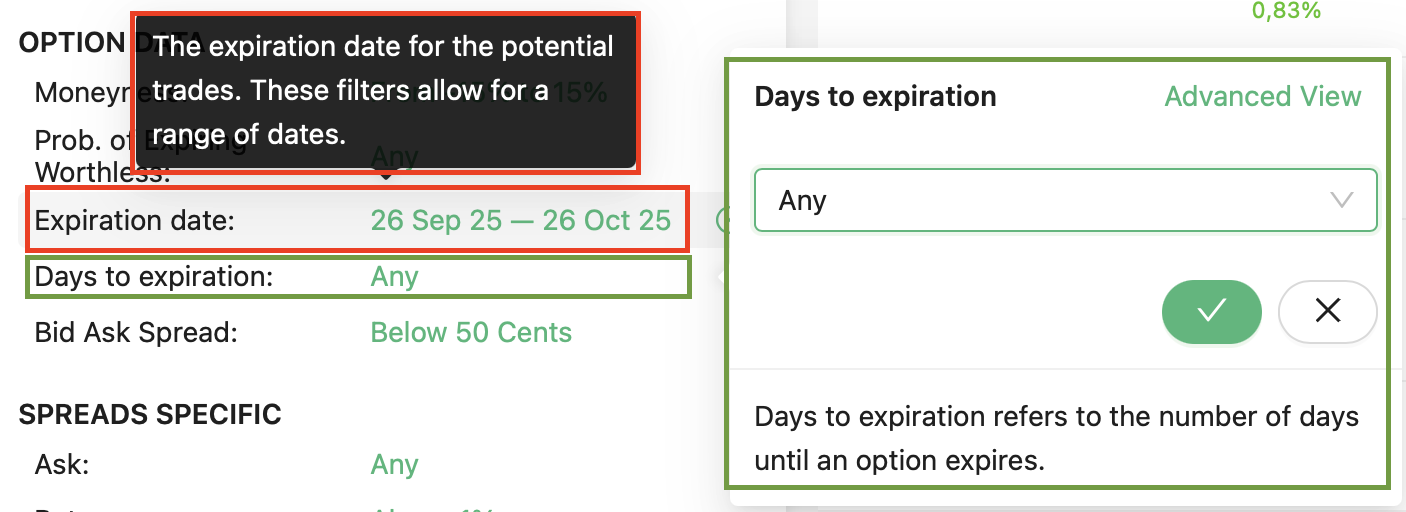
Picking the right expiration is about matching time to your plan, not guessing.
Step 8: Size the Position
Position sizing decides how much you risk, and in options the impact is bigger because of leverage. Your options trading checklist should remind you never to overallocate, even if a trade looks perfect. A small loss is manageable, but an oversized one can wipe out weeks of gains.
Simple rules of thumb:
- Risk only 1-2% of account per trade
- Set your own dollar cap and stick to it
- Remember options move faster than stocks
Keeping size under control lets you survive losing streaks and stay in the game long enough to benefit from winners.
Step 9: Plan Trade Management
Decide how you will manage the trade before you place it. Your options trading checklist should include clear exit rules: a profit target, a stop-loss, and a time stop if the trade drags on.
- Profit target = lock in winners without being greedy
- Stop-loss = cut losers before they snowball
- Time stop = exit if the trade stalls
Pre-planning avoids mid-trade second guessing. It’s easy to change your mind when money is on the line, but rules set in advance keep emotions out and discipline in. This is what makes results consistent.
Step 10: Paper Trade
Paper trading gives you a safe way to practice your process before risking real money. It helps you test your strategies, refine execution, and build habits with your options trading checklist. The trade log makes this even more powerful, since it tracks results as if they were live.
With a trade log in your options trading checklist, you can:
- Learn from past trades by reviewing stats and outcomes
- Test new strategies found in the Scanner without risk
- Manage open positions in one place with real-time updates
- Get rolling suggestions and continuation ideas (coming soon)
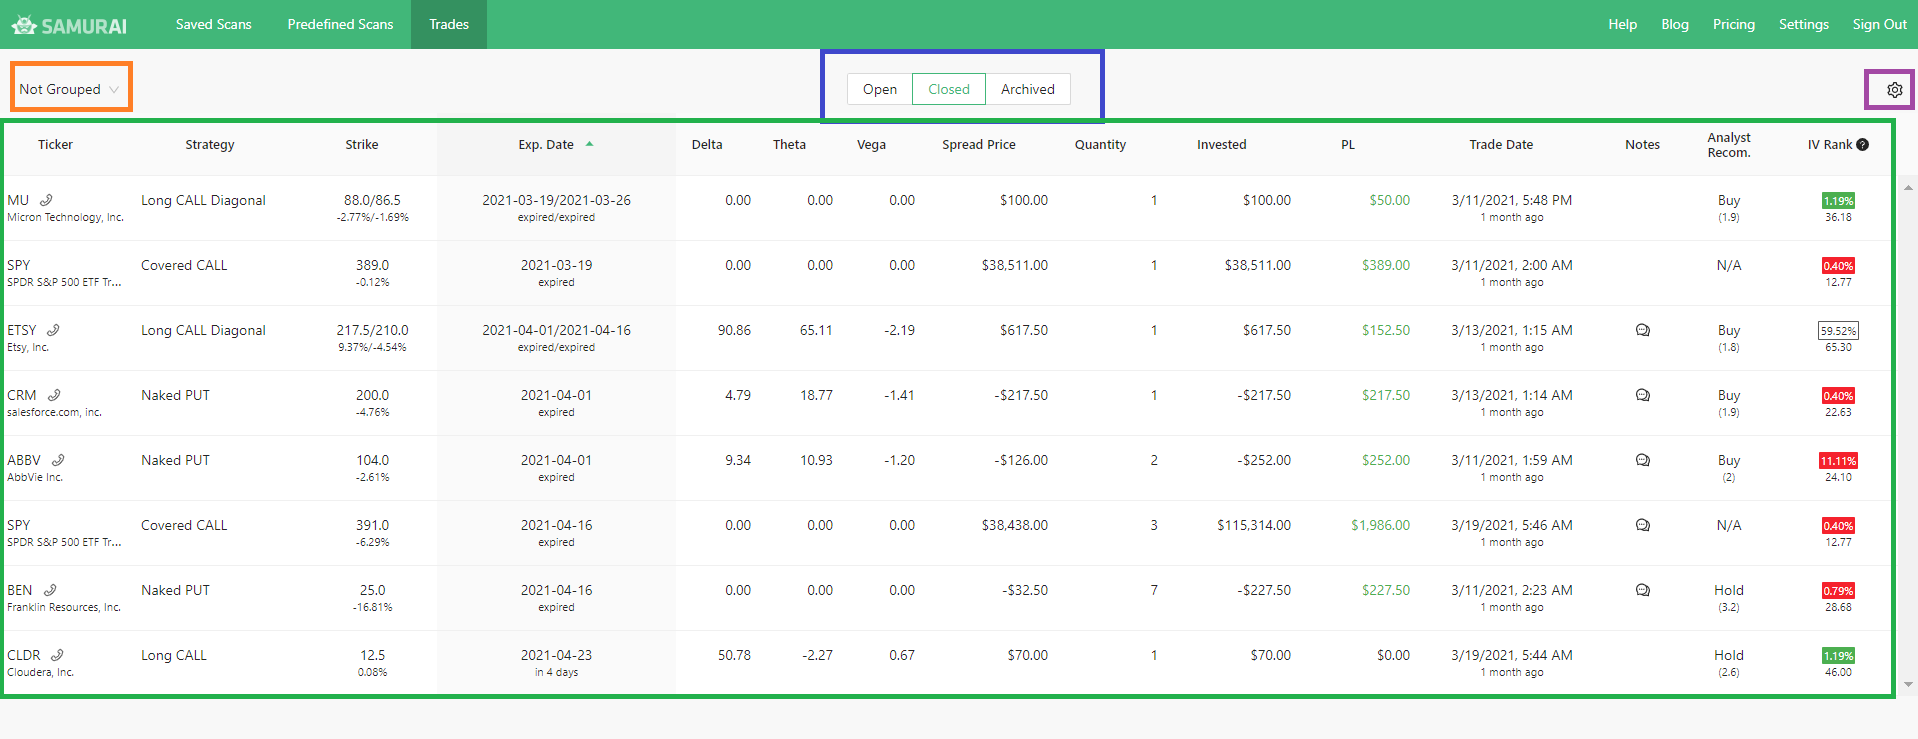
For instance, our trade log is organized into three sections: open trades, closed trades, and archived trades. You can group trades by symbol, strategy, or expiration cycle, making it easy to see where you perform best. Columns are fully customizable, so you can display the stats that matter most.
Multi-portfolio support is built in. You can track live trades, test trades, IRA accounts, or broker-specific accounts separately. Switching between them is simple using the account menu on the top row.
Adding trades is flexible. You can send them directly from the Scanner into the log, or add them manually through the order form. Each trade can be edited, closed, or archived with a click, and expanded for detailed analysis.
Paper trading isn’t just about practice, it’s about repetition with structure. By combining the trade log with your options trading checklist, you create a feedback loop: test, track, learn, and improve. This habit prepares you for real trading where money and emotions are involved, while keeping the process consistent and repeatable. To make this process even easier, you can download or revisit our complete options trading checklist, which includes all the steps and best practices covered here in one place.
AUTHOR
 Gianluca LonginottiFinance Writer - Traders Education
Gianluca Longinotti is an experienced trader, advisor, and financial analyst with over a decade of professional experience in the banking sector, trading, and investment services.
REVIEWER
 Leav GravesCEO
Leav Graves is the founder and CEO of Option Samurai and a licensed investment professional with over 19 years of trading experience, including working professionally through the 2008 financial crisis.